
Eye Candy Pigments are vibrant, high-concentration colorants designed to enhance epoxy resin projects, offering durable, long-lasting hues. Popular in artistic and decorative applications, they create stunning visual effects, transforming resin into unique masterpieces for both professional and DIY enthusiasts.
What Are Eye Candy Pigments?
Eye Candy Pigments are high-concentration colorants specifically designed for epoxy resin projects. They consist of finely ground, light-fast pigments that provide vibrant, consistent hues. Available in various forms, including powders and pastes, these pigments are ideal for creating intricate effects like cells, lacing, and marbling. Their popularity stems from their ease of use and ability to achieve professional-grade, visually stunning results in DIY and artistic applications.
Why Use Eye Candy Pigments in Epoxy Resin?
Eye Candy Pigments enhance epoxy resin projects with vibrant, long-lasting colors and unique effects. They are ideal for creating artistic designs, marbling, and swirls, offering professional-grade results. Their high concentration ensures intense color payoff, while their ease of use makes them accessible to both DIY enthusiasts and professionals. These pigments are perfect for achieving stunning visual effects in various creative applications.
Choosing the Right Epoxy Resin
Selecting the right epoxy resin ensures optimal color dispersion and durability. Clear resins like Resin Obsession or Alumilite Amazing are ideal for vibrant, professional-looking results.
Types of Epoxy Resin Suitable for Pigments
Clear epoxy resins, such as Resin Obsession or Alumilite Amazing, are ideal for showcasing vibrant pigments. Polyurethane casting resins are another excellent option, offering durability and clarity. Colored or metallic resins can also be used, though they may alter the final pigment appearance. Always choose resins with high transparency and minimal yellowing to achieve the best color retention and professional finish.
Factors to Consider When Selecting Epoxy Resin
When choosing epoxy resin, consider clarity for pigment visibility, viscosity for pourability, and curing time for project requirements. Select resins with high hardness for durability and avoid those with UV protectants if using pigments sensitive to sunlight. Ensure compatibility with pigments and molds. Brand reputation and reviews can also guide your selection for optimal results in your creative projects.
Understanding Pigment Load and Ratios
Pigment load refers to the amount of pigment added to epoxy resin, with ratios balancing color intensity and resin clarity. Start with 0.5g pigment per 1kg resin for subtle tones, adjusting to achieve desired effects without compromising resin properties.
Recommended Pigment-to-Resin Ratios
Start with 0.5g pigment per 1kg resin for subtle color, increasing to 1g/kg for bold hues. For opaque results, use 1-2% pigment by weight; for transparency, 0.5-1%. Adjust ratios based on desired color intensity and resin clarity, ensuring not to exceed 3% to maintain resin performance and avoid potential curing issues.
How to Calculate the Right Amount of Pigment
Start by determining the total weight of your epoxy resin. Use a 0.5g to 1g pigment per 1kg resin ratio for most projects. Multiply the resin weight by the desired ratio to find the pigment amount. For example, 500g resin requires 0.25g to 0.5g pigment. Adjust based on color intensity and desired finish, ensuring precise measurement for consistent results and a professional finish.
Preparing the Workspace
Clean and lay a protective cover like a drop cloth. Ensure good ventilation and organize tools. Wear gloves and goggles for safety, and have materials ready.
Safety Precautions
When working with epoxy resin and pigments, wear protective gloves, goggles, and a mask to avoid skin irritation and inhalation of fumes. Ensure good ventilation by working in a well-ventilated area or using a fan. Avoid prolonged exposure to resin fumes, as they can cause dizziness. Keep flammable materials away and follow the manufacturer’s instructions for both resin and pigments. In case of skin contact, wash immediately with soap and water. If irritation persists, seek medical advice.
Setting Up Your Work Area
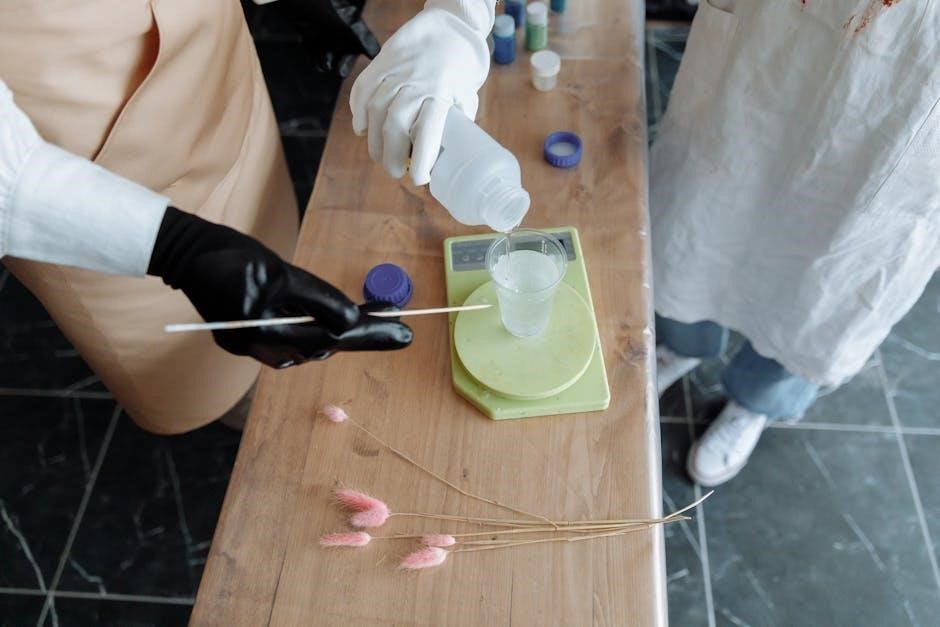
Begin by preparing a clean, stable, and well-lit workspace. Cover your work surface with protective paper, a silicone mat, or a disposable tablecloth to prevent spills. Gather essential tools like mixing cups, stir sticks, measuring scales, and a heat gun for bubble removal. Organize all materials within easy reach to streamline the process. Ensure proper ventilation and keep a fire extinguisher nearby as a precaution. Position your epoxy resin, hardener, and pigments in a logical workflow to avoid clutter and minimize errors.
Mixing the Resin and Hardener
Accurately mix epoxy resin and hardener in the recommended 1:1 ratio. Stir thoroughly for 2-3 minutes until fully incorporated, ensuring no streaks remain for proper curing.
Correct Mixing Ratios for Epoxy
Most epoxy resins require a 1:1 mixing ratio of resin to hardener. However, some systems may use 2:1 or 3:1 ratios. Always follow the manufacturer’s instructions for precise measurements. Use digital scales for accuracy. Mix thoroughly for 2-3 minutes until fully incorporated, ensuring no unmixed material remains. Proper mixing is essential for a strong, durable finish and to avoid curing issues.
Importance of Accurate Measurements
Accurate measurements are crucial when mixing epoxy resin and hardener. Incorrect ratios can lead to incomplete curing, weaken the final product, or cause structural issues. Use digital scales for precise weighing, as volume measurements can be inconsistent. Always follow the manufacturer’s guidelines for exact proportions to ensure proper chemical reactions and achieve the desired durability and finish in your project.
Adding Pigments to the Resin
Add pigments to epoxy resin for vibrant, customizable colors. Use high-concentration pigments or mica powders to achieve desired effects. Mix thoroughly for even distribution and consistent results.
When to Add Pigments
Add pigments to the epoxy resin after thoroughly mixing the resin and hardener. Start with small amounts, testing the color intensity. Avoid overloading the resin, as excessive pigment can cause mixing issues. Proper timing ensures even distribution and prevents sedimentation, achieving the desired vibrant effects in your epoxy projects.
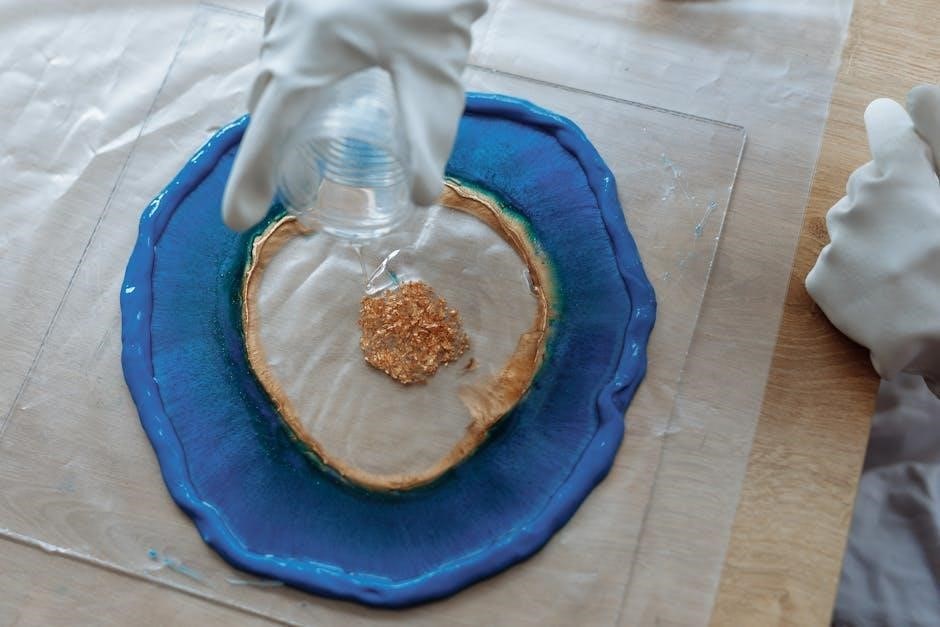
Techniques for Incorporating Pigments
For stunning effects, mix pigments gradually into the epoxy resin, ensuring even distribution. Use layering or swirling techniques to create dynamic patterns. Mica powders can be added for metallic finishes, while liquid pigments offer vibrant colors. Experiment with heat guns to manipulate flow and achieve unique marbling effects, enhancing the visual appeal of your epoxy resin projects.
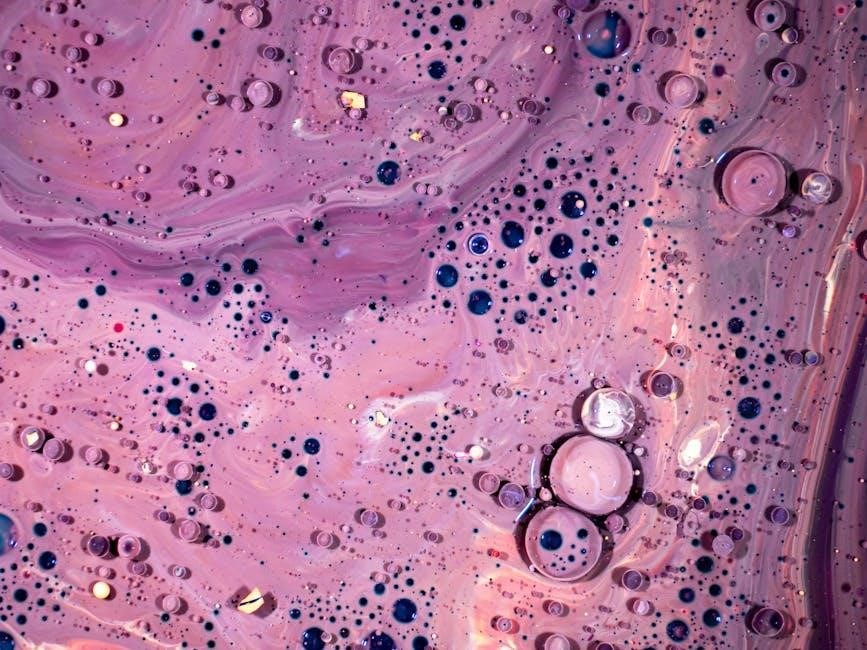
Achieving Color Effects
Layering and swirling techniques with Eye Candy Pigments create vibrant, multi-dimensional color effects in epoxy resin. Mica powders add metallic finishes, while liquid pigments enhance color intensity for stunning results.
Layering Techniques
Layering techniques with Eye Candy Pigments involve applying multiple thin coats of epoxy resin, allowing each layer to cure before adding the next. This method creates depth and dimension, especially when combining metallic finishes from mica powders or vibrant hues from liquid pigments. Start with a base coat, then build up colors gradually, using heat guns or blow torches to manipulate flow and blend edges for seamless transitions and unique effects.
Creating Marbling and Swirl Effects
Marbling and swirl effects are achieved by manipulating liquid epoxy resin mixed with Eye Candy Pigments. Use a heat gun or blow torch to create movement and blend colors. High-concentration pigments produce vivid, flowing patterns. Pour resin in layers, allowing each to set slightly before adding the next, and use tools like stir sticks or brushes to swirl and distribute pigments for dynamic, multi-dimensional designs.
Curing and Finishing
Epoxy resin typically cures within 24 hours, depending on temperature and humidity. Ensure proper airflow and avoid dust. Once cured, sand lightly for a smooth finish.
Curing Process and Timeline
Epoxy resin typically cures within 24 hours, but this varies based on temperature and humidity. Most resins start setting in 1-2 hours and fully cure in 24-72 hours. Ensure a clean, dust-free environment and maintain consistent temperatures for optimal results. Avoid disturbing the resin during curing, as it can create imperfections. Follow the manufacturer’s instructions for specific timelines and conditions to achieve a flawless finish.
Final Touches for a Professional Finish
After curing, sand the surface lightly to remove any imperfections. Polish with a high-grit sandpaper or a polishing compound for a glossy finish. Apply a clear sealant like varnish or wax to protect the resin and enhance color vibrancy. For added depth, incorporate mica powders or metallic pigments into the final coat. Regularly clean and maintain the piece to preserve its professional appearance and durability over time.

Common Mistakes and Troubleshooting
Common issues include uneven pigment distribution, air bubbles, and improper curing. Troubleshoot by ensuring accurate measurements, thorough mixing, and a dust-free environment for a flawless finish.
Common Issues When Mixing Pigments
Common issues when mixing pigments include uneven color distribution, air bubbles, and pigment settling. Improper measurement of pigment-to-resin ratios can lead to weak adhesion or cloudy finishes. Overmixing may introduce bubbles, while undermixing results in streaks. Environmental factors like humidity or temperature can affect curing, causing uneven pigment dispersion. Using low-quality pigments may lead to faded colors or inconsistent textures.
Troubleshooting Tips
- For uneven color, ensure thorough mixing and consistent pigment distribution.
- Use a torch or heat gun to remove air bubbles trapped during mixing.
- Avoid overmixing, as it can introduce bubbles and weaken adhesion.
- Apply pigments in small batches to maintain even dispersion and vibrant color.
- Ensure a controlled workspace with stable temperature and humidity for proper curing.
- Test pigments in small batches to verify compatibility and desired effects.
Leave a Reply